Hibernate is an ORM (Object-Relation Mapping) tool for Java. It is used to persist and fetch data in the database via mapping the software objects to the relational model where properties of a class are mapped to a column in a table, class or an entity is mapped to table and instance of a class is a new record in a table.
This document explains the process of creating a simple Java application which uses Hibernate version 4, to store and retrieve data from MySQL database. It also explains how to create a simple MySQL DB using XAMPP.
It is believed that the reader has a general idea of Eclipse IDE and Java.
Installing XAMPP and starting MySQL
There are various ways in which MySQL can be installed locally, namely:
- Manually
- MySQL installation wizard
- using All-in-one packages like XAMPP, WebDeveloper and WampServer
I prefer using XAMPP, because it installs many other things like myPhpAdmin, Apache, FileZila, etc. and it’s free!!
Download windows installer for XAMPP from here. Run the setup, which makes you click a few “next” buttons. Once installation is complete, go to the installation directory (“c:/xampp” by default) and run “xampp-control.exe” (or click on the desktop shortcut). XAMPP control window looks like this:-
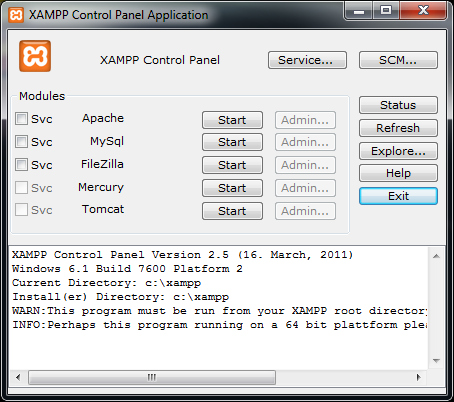
Start Apache and then MySql by clicking on the Start buttons just next to them. After Apache and MySql have been started, click on the admin button besides MySql’s Start button, this will take you to the PhpMyAdmin page for MySql.

If you see the above page loading successfully, then XAMPP has been installed and MySQL is running. Now you can use MySQL to create DB, tables and do a lot of other stuff. It is also possible to access the MySQL command prompt. Open command prompt (Start->run->cmd) and enter
cd c:\xampp
mysql –u root
This takes you to the mysql prompt where you can run your queries.
Creating DB
To use MySQL with Hibernate, we need to make a database which will store all our tables. To create a DB, follow these steps:-
- Go to your PhpMyAdmin page (http://localhost/phpmyadmin/ )
- Click on Databases
- Provide a DB name (for example, hibernatedb)
- Click Create
This will create a new database named “hibernatedb” which we’ll be using in our java code.
Creating Java Project
Before starting to create a project, you need to download the required jars. Download latest (version 4.1.2 at the time of this writing) hibernate jars from here and JDBC connector for MySQL from here.
Now, let us create a simple project in Eclipse that will use Hibernate to create table, populate data and also fetch from it.
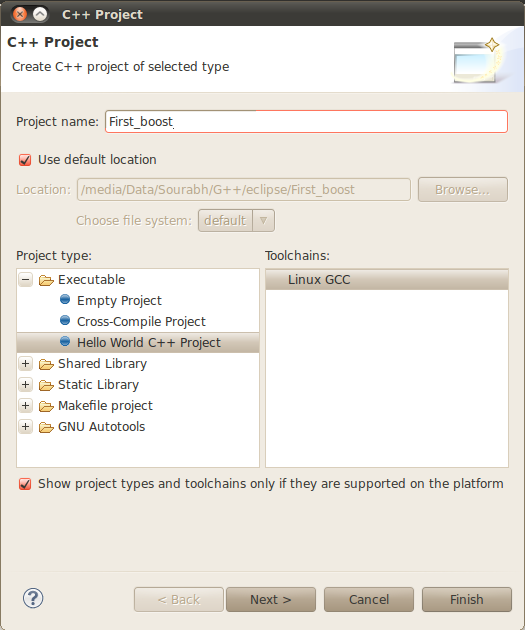
- Open Eclipse, Create a new Java Project (File->New->Java Project) and name it as “HibernateExample”

- Add the jars to build path (Right click on project name->Build Path-> Configure Build Path)

- Click on “Add External JARs” and add all the jars from “hibernate-release-4.1.2.Final\lib\required” (in the zip downloaded previously) and also the mysql connector jar.

Make sure that the mysql-connector jar is added and its location is added in the CLASSPATH, or your project will throw a “Specified JDBC Driver com.mysql.jdbc.Driver class not found” error.
Writing the code
Hibernate has to be configured to connect to a particular database. The database connections can be configured using an XML deployment descriptor (hibernate.cfg.xml) / properties file (hibernate.properties) or programmatically. We’ll use the XML deployment descriptor.
Add a new XML file in the “src” folder of your project and name it as “hibernate.cfg.xml”. Paste the following code in that file.
<?xml version='1.0' encoding='utf-8'?>
<!DOCTYPE hibernate-configuration PUBLIC"-//Hibernate/Hibernate Configuration DTD//EN"
"http://hibernate.sourceforge.net/hibernate-configuration-3.0.dtd">

<hibernate-configuration>
<session-factory>
<!-- Database connection settings -->
<property name="connection.driver_class">com.mysql.jdbc.Driver</property>
<property name="connection.url">jdbc:mysql://localhost:3306/hibernatedb</property>
<property name="connection.username">root</property>
<property name="connection.password"></property>

<!-- JDBC connection pool (use the built-in) -->
<property name="connection.pool_size">1</property>

<!-- SQL dialect -->
<property name="dialect">org.hibernate.dialect.MySQLDialect</property>

<!-- Enable Hibernate's automatic session context management -->
<property name="current_session_context_class">thread</property>

<!-- Disable the second-level cache  -->
<property name="cache.provider_class">org.hibernate.cache.internal.NoCacheProvider</property>

<!-- Echo all executed SQL to stdout -->
<property name="show_sql">true</property>

<!-- Drop and re-create the database schema on startup -->
<property name="hbm2ddl.auto">update</property>
<mapping resource="employee.hbm.xml"/>
</session-factory>
</hibernate-configuration>
In the above configuration file, we use the “hibernated” database which was created above. MySQL runs on port 3306 by default and hence the connection url as “jdbc:mysql://localhost:3306/hibernatedb “. Also, by default there is no password for root user, it you have setup a password or are using another user, give the appropriate values for “connection.username” and “connection.password” properties.
Other configuration properties relate to:-
- hibernate.dialect àThe classname of a Hibernate Dialect to be used. The SQL dialect allows Hibernate to generate SQL optimized statements for a particular relational database.
- hibernate.show_sql à Writes all SQL statements to console, if set to true.
- hibernate.connection.provider_class à The classname that implements Hibernate’s ConnectionProvider interface
- hibernate.cache.provider_class à Specifies the classname that provides CacheProvider interface.
- hibernate.hbm2ddl.autoàAutomatically creates, updates or drops the database schema on startup or shutdown(update | create | create-drop)
- hibernate.cache.use_second_level_cache: Determines whether to use second level of cache. It accepts values true or false.
The ORM tool maps a class to a table and hence we need to create a POJO class “Employee” which will correspond to our Employee table in the database.
Create a new package in src folder named “com.cc.example.hibernate” and add the class “Employee” in it. Paste the following code in “Employee.java”
package com.cc.example.hibernate;

public class Employee {
  private String firstName;
  private String lastName;
  private String email;
  private long id;
  public String getFirstName() {
  return firstName;
}

public void setFirstName(String firstName) {
this.firstName = firstName;
}
public String getLastName() {
return lastName;
}
public void setLastName(String lastName) {
this.lastName = lastName;
}
public String getEmail() {
return email;
}
public void setEmail(String email) {
this.email = email;
}
public long getId() {
return id;
}
public void setId(long id) {
this.id = id;
}
}
Hibernate needs mapping document for all objects that needs to be persisted to the database. The mapping document must be saved with .hbm.xml extension. Create a new XML file in src folder and name it as “employee.hbm.xml”. Paste the following code in that file.
<?xml version="1.0"?><!DOCTYPE hibernate-mapping PUBLIC
"-//Hibernate/Hibernate Mapping DTD 3.0//EN"
"http://www.hibernate.org/dtd/hibernate-mapping-3.0.dtd">

<hibernate-mapping package="com.cc.example.hibernate">
<class name="com.cc.example.hibernate.Employee" table="EMPLOYEE">
<id name="id" type="long" column="ID" length="20">
<generator class="assigned"/>
</id>
<property name="firstName" column="FIRSTNAME" type="string" length="20">
</property>
<property name="lastName" column="LASTNAME" type="string" length="20">
</property>
<property name="email" column="EMAIL" type="string" length="50">
</property>
</class>
</hibernate-mapping>- <class> tag defines the mapping of a class to a table in a database.
- <id> tag defines the mapping of a property of a class to a primary key in a table.
- <generator> tag defines a java class which is used to generate a unique key for every instance of a persistent class.
- <property> tag defines the mapping of a property of a class to a column in a table.
Finally, let’s write the main class to store and retrieve data. Create “MainClass” class in “com.cc.example.hibernate” and paste the following code.
package com.cc.example.hibernate;
import java.util.Iterator;
import java.util.List;

import org.hibernate.HibernateException;
import org.hibernate.Query;
import org.hibernate.Session;
import org.hibernate.SessionFactory;
import org.hibernate.Transaction;
import org.hibernate.cfg.Configuration;
import org.hibernate.service.ServiceRegistry;
import org.hibernate.service.ServiceRegistryBuilder;

public class MainClass {

private static ServiceRegistry serviceRegistry;
private static SessionFactory sessionFactory;

public static void main(String[] args) {
  try{
    // This step will read hibernate.cfg.xml and prepare hibernate for use
    Configuration cfg=new Configuration().configure();
    serviceRegistry = new ServiceRegistryBuilder().applySettings(
    cfg.getProperties()).buildServiceRegistry();
    sessionFactory = cfg.buildSessionFactory(serviceRegistry);
    //Create employee objects to be persisted
    Employee emp1=new Employee(1,"Sourabh","Soni","admin@sourabhsoni.com");
    Employee emp2=new Employee(2,"test","User1","testUser1@sourabhsoni.com");
    Employee emp3=new Employee(3,"test","User2","testUser2@sourabhsoni.com");

    //Create a handler to access methods
    MainClass handler=new MainClass()
    //insert records
    handler.insert_record(emp1);
    handler.insert_record(emp2);
    handler.insert_record(emp3);
    //Retrieve these records
    handler.getAllEmployees();
    //Update a record
    handler.updateEmployee(2, "testUser_01@sourabhsoni.com");
    //Check if the record is updated
    handler.getEmployee(2);
  }catch(Exception e){
    System.out.println(e.getMessage());
  }finally{
    // Actual contact insertion will happen at this step
  }
}

public void insert_record(Employee emp)
{
  Session session=null;
  Transaction tx=null;
  try
  {
    session =sessionFactory.openSession();
    tx=session.getTransaction();
    tx.begin();
    session.save(emp);
    tx.commit();
    session.flush();
  }catch(HibernateException he){
    if(tx!=null)tx.rollback();
    System.out.println("Not able to open session");
    he.printStackTrace();
  }
  catch(Exception e){
    e.printStackTrace();
  }finally{
    if(session!=null)
    session.close();
  }
}

public void getEmployee(long id)
{
  Session session=null;
  Transaction tx=null;
  try
  {
    session=sessionFactory.openSession();
    tx=session.beginTransaction();
    Employee emp=(Employee)session.get(Employee.class, id);
    System.out.println("Name:"+emp.getFirstName()+" "+emp.getLastName());
    System.out.println("Email:"+emp.getEmail());
    tx.commit();
  }catch(HibernateException he){
    if(tx!=null)tx.rollback();
    he.printStackTrace();
  }finally{
    if(session!=null)
    session.close();
  }
}
public void getAllEmployees()
{
  Session session=null;
  Transaction tx=null;
  try
  {
    session=sessionFactory.openSession();
    tx=session.beginTransaction();
    String SQL_Query="FROM Employee";
    Query query=session.createQuery(SQL_Query);
    List employees=query.list();
    Iterator itr=employees.iterator();
    while(itr.hasNext())
    {
      Employee emp=(Employee)itr.next();
      System.out.println("Employee id:"+emp.getId());
      System.out.println("Name:"+emp.getFirstName()+" "+emp.getLastName());
      System.out.println("Email:"+emp.getEmail());
    }
    tx.commit();
  }catch(HibernateException he){
    if(tx!=null)tx.rollback();
    he.printStackTrace();
  }finally{
    if(session!=null)
    session.close();
  }
}

public void updateEmployee(long id,String email)
{
  Session session=null;
  Transaction tx=null;
  try
  {
    session=sessionFactory.openSession();
    tx=session.beginTransaction();
    Employee emp=(Employee)session.get(Employee.class, id);
    emp.setEmail(email);
    session.update(emp);
    tx.commit();
  }catch(HibernateException he){
    if(tx!=null)tx.rollback();
    he.printStackTrace();
  }finally{
    if(session!=null)
    session.close();
  }
}

}
The method “Configuration().configure().buildSessionFactory()” is deprecated for use and hence we use a “ServiceRegistry” object to create session factory.
The project hierarchy for the project should look like:-

Right click on MainClass.java and run as Java application. Running this program should produce the below output:-
| Hibernate: insert into EMPLOYEE (FIRSTNAME, LASTNAME, EMAIL, ID) values (?, ?, ?, ?)Hibernate: insert into EMPLOYEE (FIRSTNAME, LASTNAME, EMAIL, ID) values (?, ?, ?, ?)Hibernate: insert into EMPLOYEE (FIRSTNAME, LASTNAME, EMAIL, ID) values (?, ?, ?, ?)Hibernate: select employee0_.ID as ID0_, employee0_.FIRSTNAME as FIRSTNAME0_, employee0_.LASTNAME as LASTNAME0_, employee0_.EMAIL as EMAIL0_ from EMPLOYEE employee0_Employee id:1
Name:Sourabh Soni Email:admin@sourabhsoni.com Employee id:2 Name:test User1 Email:testUser1@sourabhsoni.com Employee id:3 Name:test User2 Email:testUser2@sourabhsoni.com Hibernate: select employee0_.ID as ID0_0_, employee0_.FIRSTNAME as FIRSTNAME0_0_, employee0_.LASTNAME as LASTNAME0_0_, employee0_.EMAIL as EMAIL0_0_ from EMPLOYEE employee0_ where employee0_.ID=? Hibernate: update EMPLOYEE set FIRSTNAME=?, LASTNAME=?, EMAIL=? where ID=? Hibernate: select employee0_.ID as ID0_0_, employee0_.FIRSTNAME as FIRSTNAME0_0_, employee0_.LASTNAME as LASTNAME0_0_, employee0_.EMAIL as EMAIL0_0_ from EMPLOYEE employee0_ where employee0_.ID=? Name:test User1 Email:testUser_01@sourabhsoni.com |
Note that, we have not created any table in the Database, still the code works. This is because, hibernate itself creates a table based on “employee.hbm.xml” if it is not present. User can also create a table using PhpMyAdmin console or mysql command prompt before executing the above code.
This document explains an example with the simplest table structure, there is much more that can be explored and experimented in hibernate, as using composite keys, annotations, HQL, etc. There are a lot of resources available on the net which explains these concepts.
Hope this article was useful.
Happy coding!!