I was trying to use the multi-threading capability of boost C++ library, but found that there is no comprehensive(and appropriately brief) guide which shows how to use this library with Eclipse on Ubuntu, so I decided to write one myself.
Boost is a set of widely used cross platform C++ libraries which provide a lot of functionalities which are required by most of medium-large sized applications like multi-threading and regular expressions, but unfortunately are not available natively in C++(although some of these will be available in C++11).
This guide believes that you already have downloaded, installed and setup Eclipse for C++ in your computer(if not, download from here).
1.) Download the latest version(1.48.0 at the time of this writing) of boost library from here. Download boost_version.tar.bz2 file.
2.)Execute the following command in the directory where you want to put boost installation:-
tar –bzip2 -xf /[path_to_tar]/boost_1_48_0.tar.bz2
For example, if you stored “boost_1_48_0.tar.bz2” in “/media/Data/downloads” and want to put the installation in “/media/Installation” then go to “/media/installation” and execute:-
tar –bzip2 -xf /media/Data/downloads/boost_1_48_0.tar.bz2
Boost Libraries are divided into two categories, header-only libraries(no need to build) and libraries which require separate build. I will show how to use both types of libraries in a C++ program.
Using Header-only libraries:-
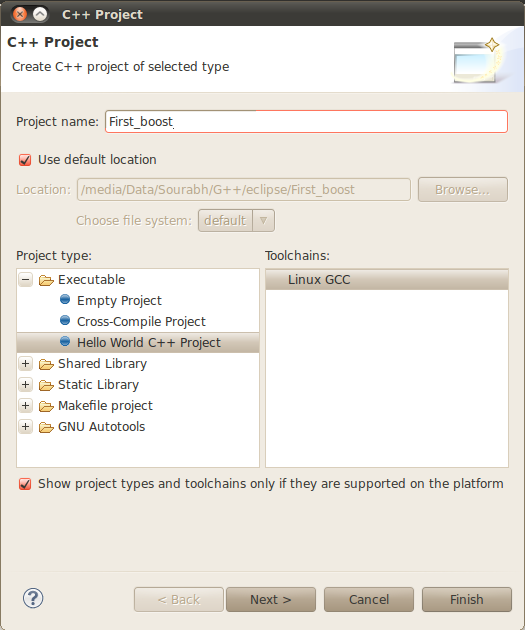
1.) Create a new C++ project in eclipse, select “File->New->C++ Project”. Give a project name and click “Finish”.
2.) Go to Project Explorer, Open YourProjectName.cpp, for this example open, BoostExample->src->BoostExample.cpp
3.) This file already has some code, which you can delete and type the following code which shows us the version of boost:-
#include<boost/version.hpp>

#include <iostream>
using namespace std;
int main() {

cout << "My first boost program with version:" <<BOOST_LIB_VERSION<< endl;

return 0;

}
Note:-all the boost library include files will be present in “boost” folder under your installation directory. Also, all the include files have an extension “.hpp”.
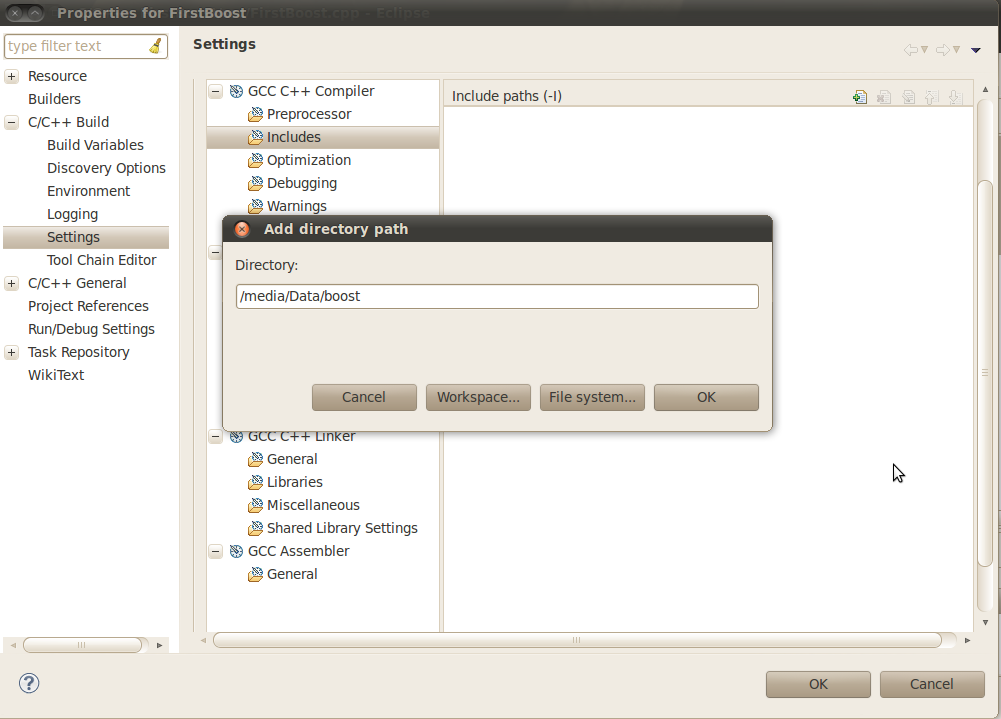
4.) Go to your project properties (Project->Properties), select C/C++ Build->Settings
5.) In the settings pane, select “Includes” under GCC C++ Compiler and click on the icon with plus sign on it(Add..). Specify the path where you have extracted boost. Press “OK” and again “OK” on Properties window.
6.)Before you can run the program and see the output, you have to build the code first. Select “Project->Build Project”.
7.)Your first boost program is ready to run. Right click on the project name in Project explorer and select “Run As->Local C++ application”. You should be able to see the output as:-
My first boost program with version:1_48
You can now try using other header only libraries like “lambda” which provides the facility of anonymous functions.
Using Boost binary libraries:-
If you want to use any of the separately-compiled Boost libraries, you’ll need to acquire library binaries. Here’s how to do it:-
1.) Go to boost installation directory.
cd /[path_to_installation_directory]/boost_1_48_0
2.) Execute
./bootstrap.sh
You can use –prefix option to change the installation directory from default[/usr/local]. You can use this script with several options like “–show-libraries” will show a complete list of libraries that can be build. Use to “–help” to see all the possible option to this command.
3.) Execute
./b2 install –libdir=/usr/lib >build.log 2>&1
This command will install Boost binaries in the /usr/lib/ directory. It is recommended that you use –with-<library> to compile specific library eg.:- –with-regex will compile only “regex” library. The output of this command is too large which might make you miss any errors, hence “>build.log” is used to direct the output to a log file and “2>&1” is used to direct all the errors to your screen.
4.) Create a new C++ project, as explained in Using Header-only libraries step 1-2 and copy the following code(from boost getting started page) in your .cpp file and save:-
[code id=6826862]
5.) Perform steps 4-5 mentioned in <b>Using Header-only libraries</b>, so that gcc knows where to find boost headers while compiling.
6.) Go to project properties, select libraries under gcc C++ linker. Click the “Add” icon in Libraries(-l) and add “boost-regex” as shown below:-
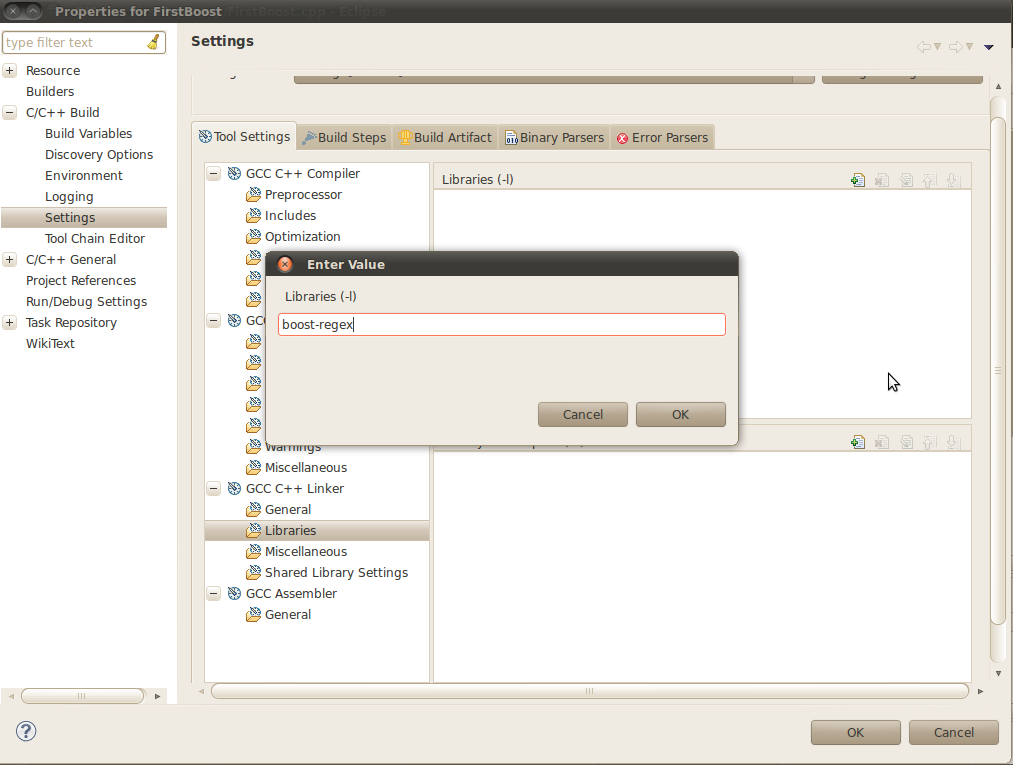
Click OK->Ok.
Note:- If you followed the instruction in this guide then boost libraries should be present in /usr/lib folder with names in format:- libboost-<libraryName>.<a/so>. To link any of these libraries, we use -l option of gcc. A common mistake while linking is to use the complete name of the library with extension eg:- -llibboost-regex.a, which generates a “connot find file” error. Please make sure to remove “lib” prefix and the extension.
7.) You’re now ready to run your first boost regex program. Build the project and click on Run->run.
Example input:-
To:-example@sourabhsoni.com
From:-user@domain.com
Subject: Boost regex works!!
Body: This program will find subject line from any input.
Output:-
Boost regex works!!
Any other boost library can be used in one of the above mentioned ways. Here is a list of boost libraries that must be build separately:-
* Boost.Filesystem
* Boost.GraphParallel
* Boost.IOStreams
* Boost.MPI
* Boost.ProgramOptions
* Boost.Python (see the Boost.Python build documentation before building and installing it)
* Boost.Regex
* Boost.Serialization
* Boost.Signals
* Boost.System
* Boost.Thread
* Boost.Wave
If all the instructions are followed as specified then you should be able to use boost libraries with Eclipse and Ubuntu(10.04).
Happy Coding!!